How to install 4G Broadband if you don’t have fibre.

Ok so if, like us, you live down a remote valley in Wales you may not have access to a decent broadband connection. In fact it is highly likely that you don’t as the whole roll out of fibre broadband in Wales has been a complete and utter fiasco, a cockup of monumental proportions and a financial scandal that no one seems to be investigating. We have promises in writing from a Welsh minister that we would be connected to fibre by 2016. Three years later there is still no sign of it!

Extract of letter from government minister promising fibre broadband by 2016

We’ve done our bit in trying to improve things including contacting our local AM and MP, the Welsh Government, the BBC and setting up a Facebook Group to try to bring fellow ‘sufferers’ in Wales together. My neighbours and I even featured in a BBC ‘news’ article; in true BBC style they investigated none of the issues and posted some dumbed down nonsense masquerading as news.

A much better read about some of the issues can be found here.

Accordingly it was time for some practical action to see if we could improve things for ourselves. We did and here’s how you can if you are lucky enough to live where you can get a 4G phone signal outside your property. Most of my neighbours are not as fortunate as me in this respect.

I will stress that I’m no expert and am just giving you the benefit of what worked for me. If it doesn’t work for you or you fall off a ladder that’s not my problem (because you should not rely on this as being from someone with expert knowledge). So big disclaimer: do this at your own risk, if it doesn’t work, dont blame me, you are advised to seek professional assistance from someone who knows what they are talking about.

Firstly establish if you can get 4G. We can’t get a signal in our house but a 4G phone can just get a signal outside the front of the house. You need to check if you can. First check the various mobile companies coverage maps online to see which provider might cover your area.

The coverage map for Three is shown below for example. In our case it says we can’t get a signal.

Coverage map for our postcode

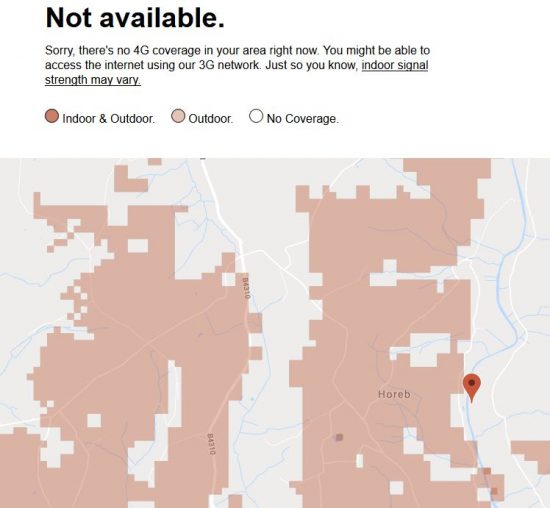
In fact the postcade location isn’t quite accurate and we are just on the edge of the shaded area up and to the left of the location pin. So our theoretical reception is marginal.

Then get/borrow/ask a friend with mobile phone on that network to check if you can get a 4G signal at your location. If you can check at each (open) upstairs window around the house or even put a ladder up and try (without falling off). If you can get some sort of signal outside the building you are probably in luck.

Once you have established that you are in with a chance you’ll need; a 4G router, a phone SIM card (with data), and external 4G aerial and an aerial mast.

Just for the sake of completion I’ll mention that EE offer an ‘all in one’ 4G install service and ongoing contract – but it’s expensive.

You need an unlocked 4G router that will accept a phone Sim phone/data card. I bought a secondhand Huawei E5186s off Ebay for around £55. This is an old model and I believe that they were ‘badged’ for European Telecom companies and were being sold off as surplus.

Front of router

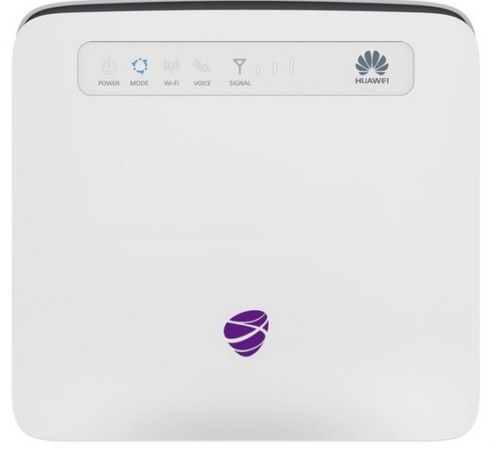
Your router should have 2 aerial sockets on the back where you can either screw two (supplied) indoor aerials or the two leads from an external aerial.
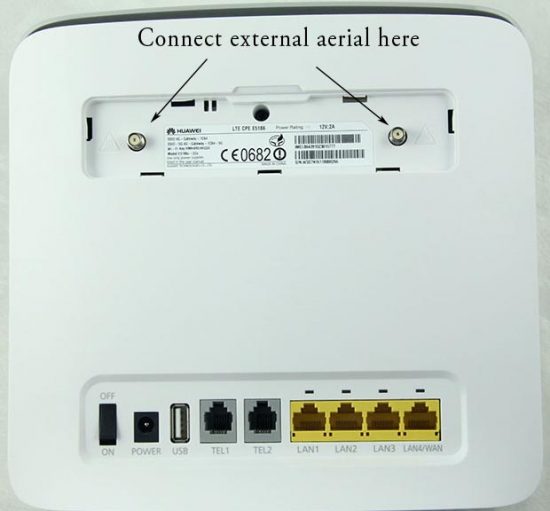
Back of router

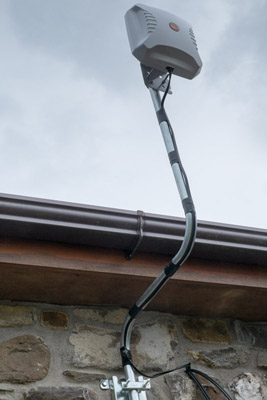
You need to securely fix a mast and a 4G aerial on the outside of your house. Location is important; it generally wants to be at the highest point on your house you can get it and be orientated towards the phone mast transmitting your signal. If you are in a rural area like me it is likely that there is only one phone mast serving your property. Ours is 8 miles away. However, the lead to the aerial should not, ideally, be longer than 5m because of signal loss; so you will need to think carefully about location of the aerial and router into which you plug the aerial leads. The router also needs a power supply (so you’ll need a power outlet nearby) and you will need to distribute it around your house via wi-fi or ethernet cable (a solution for the latter might be to use Powerline adapters).

You can find the location of local telecoms masts using the Mastdata website (sign up is free for 30 days).

Our aerial is a Poynting Xpol-2 this is a directional aerial as we know there is only one phone mast serving our property. I lined the aerial up by plotting our house and the phone mast on Google Maps and drawing a line between the two. I then tweaked it by watching the signal strength bars. The Poynting website has some good information on installing an aerial. There are also some good videos at the bottom of the page explaining things like cable loss.

An onmi directional aerial may be more appropriate where there are several masts in range. In extreme range situations a twin Yagi aerial may be better; so you may need to seek out more information on this from a specialist supplier (told you I’m no expert). There is some good background on aerials here.

Poynting Xpol – 2

The Xpol – 2 has fixed 5m leads that terminate with standard connectors that screw straight into the aerial sockets on the router. So now all you have to do is fix your aerial mast to your house, secure the aerial to the mast (I got my mast and fittings from Toolstation), secure the twin cables and run them into the house, probably by drilling through the wall, or through a window frame or via some other means and connect the leads into the back of the router. You can then plug your computer in via ethernet or use the wifi facility.

Our aerial on a cranked pole just above eaves level on the side of the house facing the phone mast 8 miles away near the Carmel telecoms tower.
Here’s our aerial on a cranked pole just above eaves level on the side of the house facing the phone mast 8 miles away near the Carmel telecoms tower.

You will of course need a phone card/data sim for your chosen provider. I initially bought a 2Gb PAYG data card just to check all was working. This is just inserted into a spring loaded slot on the side of the router. In my case it is Micro sim (so be aware of Sim sizes if you are thinking of switching for a phone Sim as many phone Sims are smaller nano size).

Mobile phone companies sell both data Sims and phone Sims. The former are just for tablets etc. and just for data. They tend to be more expensive and until recently you could only use a data card in a wi-fi router. Since an Ofcom decision (I think) in 2018 it has been possible to use an ordinary phone Sim with a data allowance (often unlimited) in a data only device. These tend to be cheaper and my Three Network phone card on a 24 month contract with unlimited data is £20 a month (these deals can fluctate). I’ve had no issues using a phone card with unlimited data. Perhaps just buy a cheap PAYG one with a small amount of data for testing first before you sign up to a contract? Don’t forget that once you ditch your landline broadband you are entitled to a saving on the line rental charges as well. I shall wait until I’m out of contract before giving BT the ‘two fingered salute’. I still intend to keep a landline for now just in case fibre does come along in the future but I may well experiment with Voice Over Internet (VOIP) calls in due course.

Basically that’s it. Turn your router on and hope that the signal bars light up, we get between two and three bars eight miles from the transmitter. If they do light up you are ‘in business’. Tweak the aerial orientation if necessary. It normally takes a while (15 minutes?) until your new Sim card is registered on the network.

If you need to access the router settings for the Huawei just type 192.168.8. into the browser bar; the default username and password is usually ‘admin’ for both.

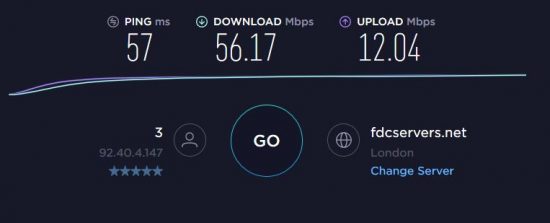
So before this I had internet speeds of around 1.4Mbps down and 0.3Mbps up (for urban readers, shaking their heads in disbelief, that is better than many others in rural areas). Now the speed varies depending on load on the phone mast etc but this is what I just measured (It can be less it can be more) as I wrote this. 50 Mbps is an excellent result.

As I say, if you’re in the same situation, and know that there is some sort of 4G signal available to you this may be worth trying (but as I keep repeating don’t blame me if it doesn’t!). Good luck.

Share

Rachel Sermanni at The Magic Lantern, Tywyn

Well its been a quiet few weeks for us old codgers. However, for the next 3 weekends we have 3 gigs lined up. The first was a trek up to Tywyn to see Rachel Sermanni in concert (last night) then next weekend we’re off to see Nick Cave play in Koko, London as John managed to get tickets for the special gig he is doing there as part of his film 20,000 Days on Earth. Then the weekend after it’s back to Tywyn to see Robyn Hitchcock who I blogged about earlier in the year when he played at the Laugharne Weekend. Crickey, at our age, we should be sat on the sofa watching the TV with a mug of cocoa not hurtling round the UK to listen to quirky folk play music in quirky places.

The Magic Lantern, Tywyn
Rachel Sermanni at The Magic Lantern, Tywyn

So speaking of quirky we headed off to The Magic Lantern yesterday afternoon in the van. Liz spent many weekends as a child in and around Tywyn so it was a trip back down memory lane to go back there. We ambled across country, in the annoying way old folk do (if you’re stuck behind in a car whilst John scans the countryside for photographs) and stopped off in rainy Aberdyfi for a cup of tea and fish and chips before trundling into Tywyn an hour or so before the gig. The Magic Lantern is a delightfully converted old Assembly Rooms/Cinema that has real character and rather fine acoustics.

Hitchcock at the Magic lantern
Hitchcock keeps an eye on proceedings at the Magic Lantern, Tywyn. This will be very weird in two weeks time when Hitchcock watches Hitchcock!

I get quite a buzz out of hearing new people for the first time and I’m not too sure how I first strayed across Rachel. ‘That sounds good’ I thought not realising that she was only a tad over 20 years old. Our paths nearly crossed in Clonakilty in the south west of Ireland when she was playing in De Baras pub but we were already going to another gig at Baltimore Fiddle Fair. So, as she lives in Scotland and not that much music gets to the far west of Wales, it wasn’t until last night we got to see her.

What a delight it turned out to be. The venue was perfect, the audience, although not large were attentive, and Rachel was delightful with the bubbly enthusiasm of one so young. Do not be deceived – her songs, voice and delivery are mature. Each song is is sung with a delivery that emphasises its meaning, a little stop or a little smile can mean a lot in these songs. Because she is so unique it’s quite hard to categorise her music; I’ve heard things like ‘folk noir balladeer’ banded about but that doesn’t really do her justice. Rachel is Rachel and I very much doubt she is ever going to be neatly slotted into any pigeon hole.

Songs that stood out for me were ‘Ever Since the Chocolate’, ‘Song to a Fox’, the Robbie Burns song ‘Ae Fond Kiss’ (which I hated when I heard Eddie Reader do it) and the delicious ‘Eggshells’ which was an encore sung without the microphone.

Rachel Sermanni
Rachel Sermanni singing ‘Eggshells’ at the Magic Lantern, Tywyn

A really good gig and it just proves that if you keep your ears open there is great stuff out there. Not wishing to turn this into a rant (us old folks are pretty good at that Rachel – and I’ve done it previously here anyway) I just wish a few more people would turn off their ‘mind numbing’ televisions, that are spewing out plastic pap in the spaces between the commercials, and get along to gigs like this.

After such a good evening what else could we do but park the van down by the estuary and fall asleep to the sound of the wind blowing through the trees. It beats a mug of cocoa and the goggle box any night.

Share

Building a Pole Barn Part 2

Following on from our first page about building our own barn we have started constructing the piers to support the upright timbers that will form the barn uprights. As previously described these footings have had to be a substantial depth in places to get down below the in-filled ground where we are building the barn.

New shuttering
The first job was to construct some shuttering. In this case I used the cheapest timber I could find (which turned out to be T&G pine cladding). This certainly wouldn’t be strong enough for professional use; but hopefully will last to build 8 piers.

I decided to construct the deepest pier first and will then cut the shuttering down as we progress to the smaller ones. So the shuttering was carefully placed in the first hole on the concrete pad, ensuring that the centre of the shuttering in the hole would be 4m from the next. The shuttering was then given extra support with some soil around the base and bits of wood wedged between it and the sides of the hole. Liz gave the inside of the timber a coating of Aldi’s cheapest cooking oil to help stop the shuttering sticking. I then proceeded to fill it with concrete. I put some steel mesh (that I had left over here) in the centre (ensuring 50mm concrete cover to ensure that it wouldn’t cause the concrete to spall if it rusts). As I filled the shutter with concrete I used a thin stick to ‘poker’ the concrete to remove air bubbles etc.

Concrete column
Concrete pier constructed off the concrete pads we put in the bottom of the hole first. The piers have steel reinforcement and a galvanised strap set in the top to anchor the wooden barn columns.

I set a small marker pin in the top in the exact centre to help with measuring to the other columns and also set a galvanised steel strap in the top of the column exactly 100mm from the centre. This strap should(!) be in the correct place to anchor the 200mm square timber uprights I’m looking to use for the barn columns.

After 48 hours I unscrewed the shuttering and removed it to leave an impressive concrete foundation column going down nearly 2m. I reckon this should be adequate for what is after all a rather large garden shed!

Setting Out
Once we had the first column in place we then started to set out the next one by stringing a centre line through the rest of the holes along the back of the shed.

By running a string line and measuring we were then able to position the shuttering for the next column. However, we also had to ensure that the top of the concrete would finish level with the first (i.e. we are now having to work in 3 dimensions). Lacking an expensive laser level I bought a cheap water level off Ebay for a few pounds and used this old fashioned technology to get the columns level. By putting the shuttering in upside down first I could measure how much to cut off the bottom before inverting it and repositioning and rechecking prior to concreting the second column. This process will be repeated until we have done all 8 columns.

Using a water level to determine the column levels
To show this clearly I am holding the level on the outside of the shuttering. The water level (coloured with a bit of food colouring) allows me to check that the top of the shuttering is exactly the same height as the first column.

Disclaimer; I am not a structural engineer or a builder so the whole project is more ‘belt and braces’ than calculations and you should not rely on my design for your own building!

Continue to Part 3


Share

Building a Pole Barn Part 1

One of our projects on the smallholding is to construct a barn for storing logs and implements etc. I’ve looked at commercial barns etc. and decided that in light of the cost (especially as we are planning to undertake some expensive changes to the house as well) we will build this ourselves. Disclaimer; I am not a structural engineer or a builder so the whole project is more ‘belt and braces’ than calculations and you should not rely on my design for your own building!

Originally I was was thinking about building a simple pole barn from old telegraph poles and I scoured the internet for plans. In actual fact there isn’t much available in the UK with most information being in the USA. In particular I came across the Barn Construction Resource Centre which had some nicely constructed barns. As a consequence I decided to go more down this route. Hopefully building something that looks a tad more pleasing to the eye. Hence why the title is about a pole barn but the structure is more of a ‘cut frame’. However, the same technique could be applied and could be simplified by just putting the poles straight into the ground. Not an option in my case because of the ‘landfilled ground’ where I am building it.

The first thing was to check the planning situation and to ensure that it would fall within permitted agricultural development. So the first job was to contact the local planning department and submit an ‘Application for Prior Notification of Proposed Agricultural Development’. For this you need to submit 4 copies of the application form, describing the size and type of the building, together with 4 copies of the plans showing the extent of your land and the location of the proposed building. You don’t need detailed plans of the building. The council then has 28 days to confirm that the proposal doesn’t need Planning Permission (or otherwise). In my case I got a letter after about 6 weeks saying that it was permitted development and that I didn’t need planning permission.

Although I knew roughly the size I was going to build the next stage was to come up with some more detailed construction plans. So using the American site above I roughed out some plans for a monopitch barn with an overhang on the front that would be about 12m long by 6m wide with 3 bays. As the plans are going to evolve as ‘I work things out’ I’ve put small copies of my initial thoughts here and hope to put better and bigger plans together with construction details as I progress. Hopefully I may by then have ironed out any snags if anyone else wants to have a go!

Barn Plans
The ‘rough idea’ of how things will look. I’ll add bigger more detailed plans at a later stage once I know things are going vaguely according to my ideas!

The land I am building this on was quite low and has been filled with rubble. As a consequence the soil is not ideal for foundations; so the plan is to level the top then dig eight holes down to firmer subsoil with an excavator. I will then pour a concrete pad at the bottom of each hole approx 150mm thick. Once this has cured I will form shuttering on top of the pad to pour concrete pillars that will finish approx 150mm or so above ground level. These concrete piers will have to all be perfectly level and in the correct place as the wood columns of the barn will then be built off these. This section of photo from one of the barns on the above site shows you the idea.

Concrete Piers for Barn
Concrete Piers for Barn. As these go down below the infill to solid ground the barn should remain stable. Once the land has settled for a few years the level can be made up with stone or even concrete.

So last weekend end a neighbour came over with his JCB and scraped the land level. We then carefully marked where the columns would be; checking it was square by ensuring that the diagonals were the same distance apart. We then dug out each hole; the back ones had to be quite deep to get down to solid ground. In fact the deepest are around 2m deep!

Barn Foundations
The land levelled, holes dug and concrete pads at the bottom of each hole. We will then construct concrete piers off each pad in exactly the right place for the barn uprights. I’ll probably put a bit of steel mesh (some lying around somewhere!) for extra reinforcement in these.

Then this weekend I hired a mixer and got a couple of tons of ‘all in’ sand and gravel delivered and, with the help of our son who was visiting us for Easter mixed, enough concrete to fill the bottom of each hole to a depth of at least 150mm. Before tipping the concrete in we jumped in and cleaned the loose fill out by hand ensuring a nice firm base for the concrete.

Jonathan
Jonathan gets to spend an exciting Easter in a hole when he visited his parents! The holes at the back are nearly 2m deep so dad got sent down those.

The next stage will be to shutter the concrete piers of these pads and concrete these. I’ll try and keep you posted as we go!

Mixing Concrete
John and Jonathan mix concrete. The container, in the background, is a recent arrival in preparation for storing materials when we do the building work on the house. Once that is done it will probably be moved to sit alongside the barn to provide secure storage.

Go to part 2 to learn more

Share

Fencing and Cutting Back Overgrown Hedges

One of the tasks that had to be done after planting our new woodland was fencing the area to prevent stock getting in amongst the trees and eating them. So in the last week or so we have had contractors here cutting back the overhanging trees and hedge and installing some new fencing and gates.

Post and wire fence
The New Fence runs up past the established wood and fences off some of the newly planted wood. We have put in metal gates for easy access in the future.

The contractor was hoping to be able to use his tracked post hole knocker for most of the work but the slopes and wet land conspired to make this a bit problematic. So some of the fencing work had to be done by hand. We also have a bit of ‘making good’ to do with the pasture once the land dries out a bit..

Agricultural Fencing
We have a bit of pasture to reseed etc. We thought we might try putting a Barn Owl box on the tree that we had to cut a large branch off.

We also took the opportunity to fence around the spring that feeds our house water supply. It is good practice to do this to prevent the possibility of animals fouling the supply. Also this area should become quite wild and overgrown providing a moist habitat for insects and animals etc.

Fence around water Supply
Our new fence around water supply to keep out the pathogens!

Share

Photographing Red Kites at Gigrin Farm

With the recent blast of cold weather we took the opportunity to get out to try to get a few winter shots.

Elan Valley Farm House in Winter
Elan Valley Farm House in Winter with a dusting of snow.

As this meant being out and about looking for wintry locations (as above) we ended up back at the Elan Valley and decided to go Gigrin Farm the Red Kite feeding centre near Rhayader, Powys. Gigrin is well known to many wildlife photographers and at feeding time you will see dozens, if not hundreds of Red Kites at close quarters.

Red kite at Gigrin
Red Kite at Gigrin Farm, Powys © John Burton

Feeding takes place at 2.00 p.m. in winter and 3.00 p.m. in summer; so get there at least 10 minutes before. There is a selection of wooden viewing hides and some taller specialist photography hides. They are all roughly the same distance from where the birds are fed and the photography hides are probably only necessary for those with very large lenses (particularly if they want to point them skywards) and tripods. For first timers here like us it’s probably just as good to use one of the ‘normal’ (and less expensive) hides. Particularly as the Kite behaviour at feeding time is frantic and it takes a while to observe and learn how the birds are behaving. When the initial action stops after 45 minute stick around because the younger birds who have waited their turn (there is a ‘pecking order’) will come in to feed. By now there is also less of a frenzy to the feeding and picking out shots becomes a tad easier (not easy!).

Unfortunately, despite a bright start to the day, the cloud built up so that by 2.00 p.m. the light was fairly grim making focusing difficult and exposing even harder. As I don’t have a very long lens I used a 300mm f4.0 on Liz’s Canon 40D (to take advantage of the crop sensor). This enabled me to quite usefully fill the frame. It was also necessary to use AI Servo mode to assist with focusing and whilst difficult the 40D did better than I expected in the poor light. However, exposing for the birds correctly against the dull bland sky meant an almost perfect white background and resulted in images that have a very ‘graphic’ quality; as if they are straight out of a bird illustration book. Whilst the shot above, for example, was not what I was hoping to achieve I think they have an interesting quality and would look good as greeting cards etc.

So we’ll definitely go back when we think the light is better one day.

Share

Planting Our New Wood in Wales

Well it’s just over a year since we moved to Wales and time has flown by. When we first moved here we both felt that it might be good to plant some more native woodland. Our reasoning was that, although we won’t be alive to see the mature trees, this would be our opportunity to leave a small legacy for the future together with providing great habitat for wildlife. Not to mention that it would go some way to reducing our carbon footprint.

Planting Native Woodland on our Smallholding
Our two man tree planting team plant 3600 trees in around 3 days!

Accordingly we are planting the steepest parts (around 5.5 acres) of our land with around 3600 trees to create a native wood that will encourage biodiversity. Anyway today our two man planting team, working for Howard at Heritage Woodlands, arrived and started to mark out the land prior to planting the trees complete with stakes and tree guards.

Steep Woodland planting
The land is steeper than it looks with the tyre tracks showing where the Quad bike had difficulties; so everything is being done by hand on the slope.

The planting mix consists of 50% Ash, 20% Oak, 10% Hazel, 10% Field Maple and 10% Bird Cherry. The planting is hard work as it involves walking up and down the slope all day so the guys have our admiration as they are planting around 1000 trees a day between them! Of course for each tree they have to walk up and down 4 times (digging the hole, planting the tree, putting the guard on and putting the cane in).

Trees planted on our land
Trees being planted on our land in Wales.

Once the planting is finished the area around each tree will be sprayed to help keep them free from grass etc. Now we will have the task of keeping the planting clean for a few years until the trees are growing well. Voles can be a particular problem if the grass gets too long; as they can get inside the plant guards and start gnawing the bark of the trees.

It will be great to look back in 10 years time once the trees have started to get established.

One day, long after we have ‘kicked the bucket’ there will be a woodland here for future generations to enjoy and timber to use or to heat someone’s house. Hopefully the Buzzards and Red Kites will still nest here and wheel overhead. There is nothing more glorious than wandering out on a Spring morning and hearing the cry of the Buzzards. In a world of short term thinking it feels rather refreshing to be doing something that will take 50 to 100 years to come to maturity.

Share